How to build your own ZX80/ZX81!
This page details the construction of your own ZX80. Follow this link to build an NMI generator which, when used with the ZX80 circuit detailed below and the ZX81 ROM, will produce a FULLY FUNCTIONING ZX81 USING OFF-THE-SHELF COMPONENTS!
(last updated 15th January 1999 - for changes, see the amendment history).
by Grant Searle BSc.
For many years now I have been working with the latest technology using high-powered computers. However, nothing nowadays can replace the time when the first home microcomputers hit the streets. I am a keen collector of the home computer era. Follow this link to see my current collection. In those days you HAD to make your programs fit the hardware and memory available. This added to the enjoyment of programming to see something you had written to fit in a few K spring to life. The later ZX81 is very similar to the ZX80 except a lot of the ICs in the 80 has been merged into one chip. As a result, you can learn a lot about the workings of the ZX81 by referring to the ZX80 circuit. I have several computers from the start of the 80's but have always liked the Sinclair ZX80 for the following reasons:
1. It was so tacky :)
2. It did not have a single dedicated IC in sight.
It is because of the second reason this page has come into existence. Here I show you how to build your own piece of history. ALL parts for the ZX80 are available from most of the larger electronic companies.
I must point out this is not a job for the absolute beginner. You will need to blow your own EPROM image and it will probably be a distinct advantage to have access to an oscilloscope in case it doesn't work. I can assure you the circuit supplied here DOES work without any modifications.
I have, however made the following modifications for my own version:
1. I originally used a 6264 SRAM to make the base memory 8K instead of 1K. I have since
replaced this with a 62256 (a 32K x 8 chip) to bring the memory up to the "full
16K" (the unused address line is tied to a power line).
2. My TV has a video input socket so I did not use the video modulator (to save a few quid
as I didn't have one in my spares box). I have since found one and now use the UHF output
into a TV.
3. I could not get the ceramic resonator. Instead I used a crystal and used a load
capacitance of 47pF.
The complete computer is built on a large piece of perforated stripboard. All digital connections are made using wire-wrap wire as this is a lot thinner than conventional hook-up wire so the data and address bundles can be tied to form a neat layout. The positioning of the ICs in relation to each other matches the positioning in the original ZX80.
I recommend printing the circuit out on an A3 sheet if possible. The scan is not perfect but hopefully you should be able to work out any areas which aren't very clear. I am currently tidying up the scan and will re-post it once complete.
Begin construction by positioning the IC sockets (see my pictures below for guidance). Next I recommend wiring the data and address buses for the top half of the circuit. As each wire is soldered it, mark it off on the circuit diagram. This helps avoid any errors resulting from missing connections. Wire in the logic ICs, resistors, capacitors and diodes. As virtually all pins on every IC are to be connected, any errors made will become obvious as more connections are made. For initial testing, there is no need to wire the keyboard into the circuit.
Once all components are soldered and without any ICs inserted into the sockets, connect a continuity tester between the power supply pins. If a short exists then check the underside of the board for any missing track breaks or flakes of copper between tracks. If all is well connect a power supply (current regulated to 500mA if possible). Check the +5V and 0V connections on each IC socket. Turn off the supply and insert the ICs. Turn on the power supply and the television or monitor. If the circuit is working then expect a power consumption of around 310mA. If using a TV then adjust the tuning to get a picture (note: the display of black text on white will require the brightness control of the TV to be turned up). A working circuit should show an inverse "K" in the bottom left of the screen. If all is well then wire in the keyboard if not already done.
This is a full list of discrete components required to build the ZX80 excluding any hardware such as power supplies, nuts and bolts etc.
Component  Type             Qty
No
IC1        Z80A              1
IC2        2732 4K EPROM     1
IC3/4      6264 8K SRAM      1
IC5        74LS373           1
IC6-8      74LS157           3
IC9        74LS165           1
IC10       74LS365           1
IC11,12    74LS00            2
IC13       74LS04            1
IC14,15    74LS05            2
IC16       74LS10            1
IC17       74LS32            1
IC18,19    74LS74            2
IC20       74LS86            1
IC21       74LS93            1
IC22       7805              1

D3-10      1N4148            8

X1         6.5MHz Xtal or    1
           ceramic resonator

C1-6,12,13 47nF              8
C8         22uF              1
C9,11,14,
15         47pF              4
C10        1uF               1

R29        180R              1
R35        1M                1
R1,3-11,18,
22,23,27,
30,34      1K                16
R32        330R              1
R21        220K              1
R13-16,?   47K               6
R2,25      470R              2
R19        2k2               1

SW1-40     SPST Push         40

Wire wrap cable for
interconenctions             1 reel (25m)
3.5mm Jack Socket            2
Phono socket                 1
Vero Board                   1
40 Pin DIL socket            1
28 Pin DIL socket            1
20 Pin DIL socket            1
16 Pin DIL socket            5
14 Pin DIL socket            11
Back to contents
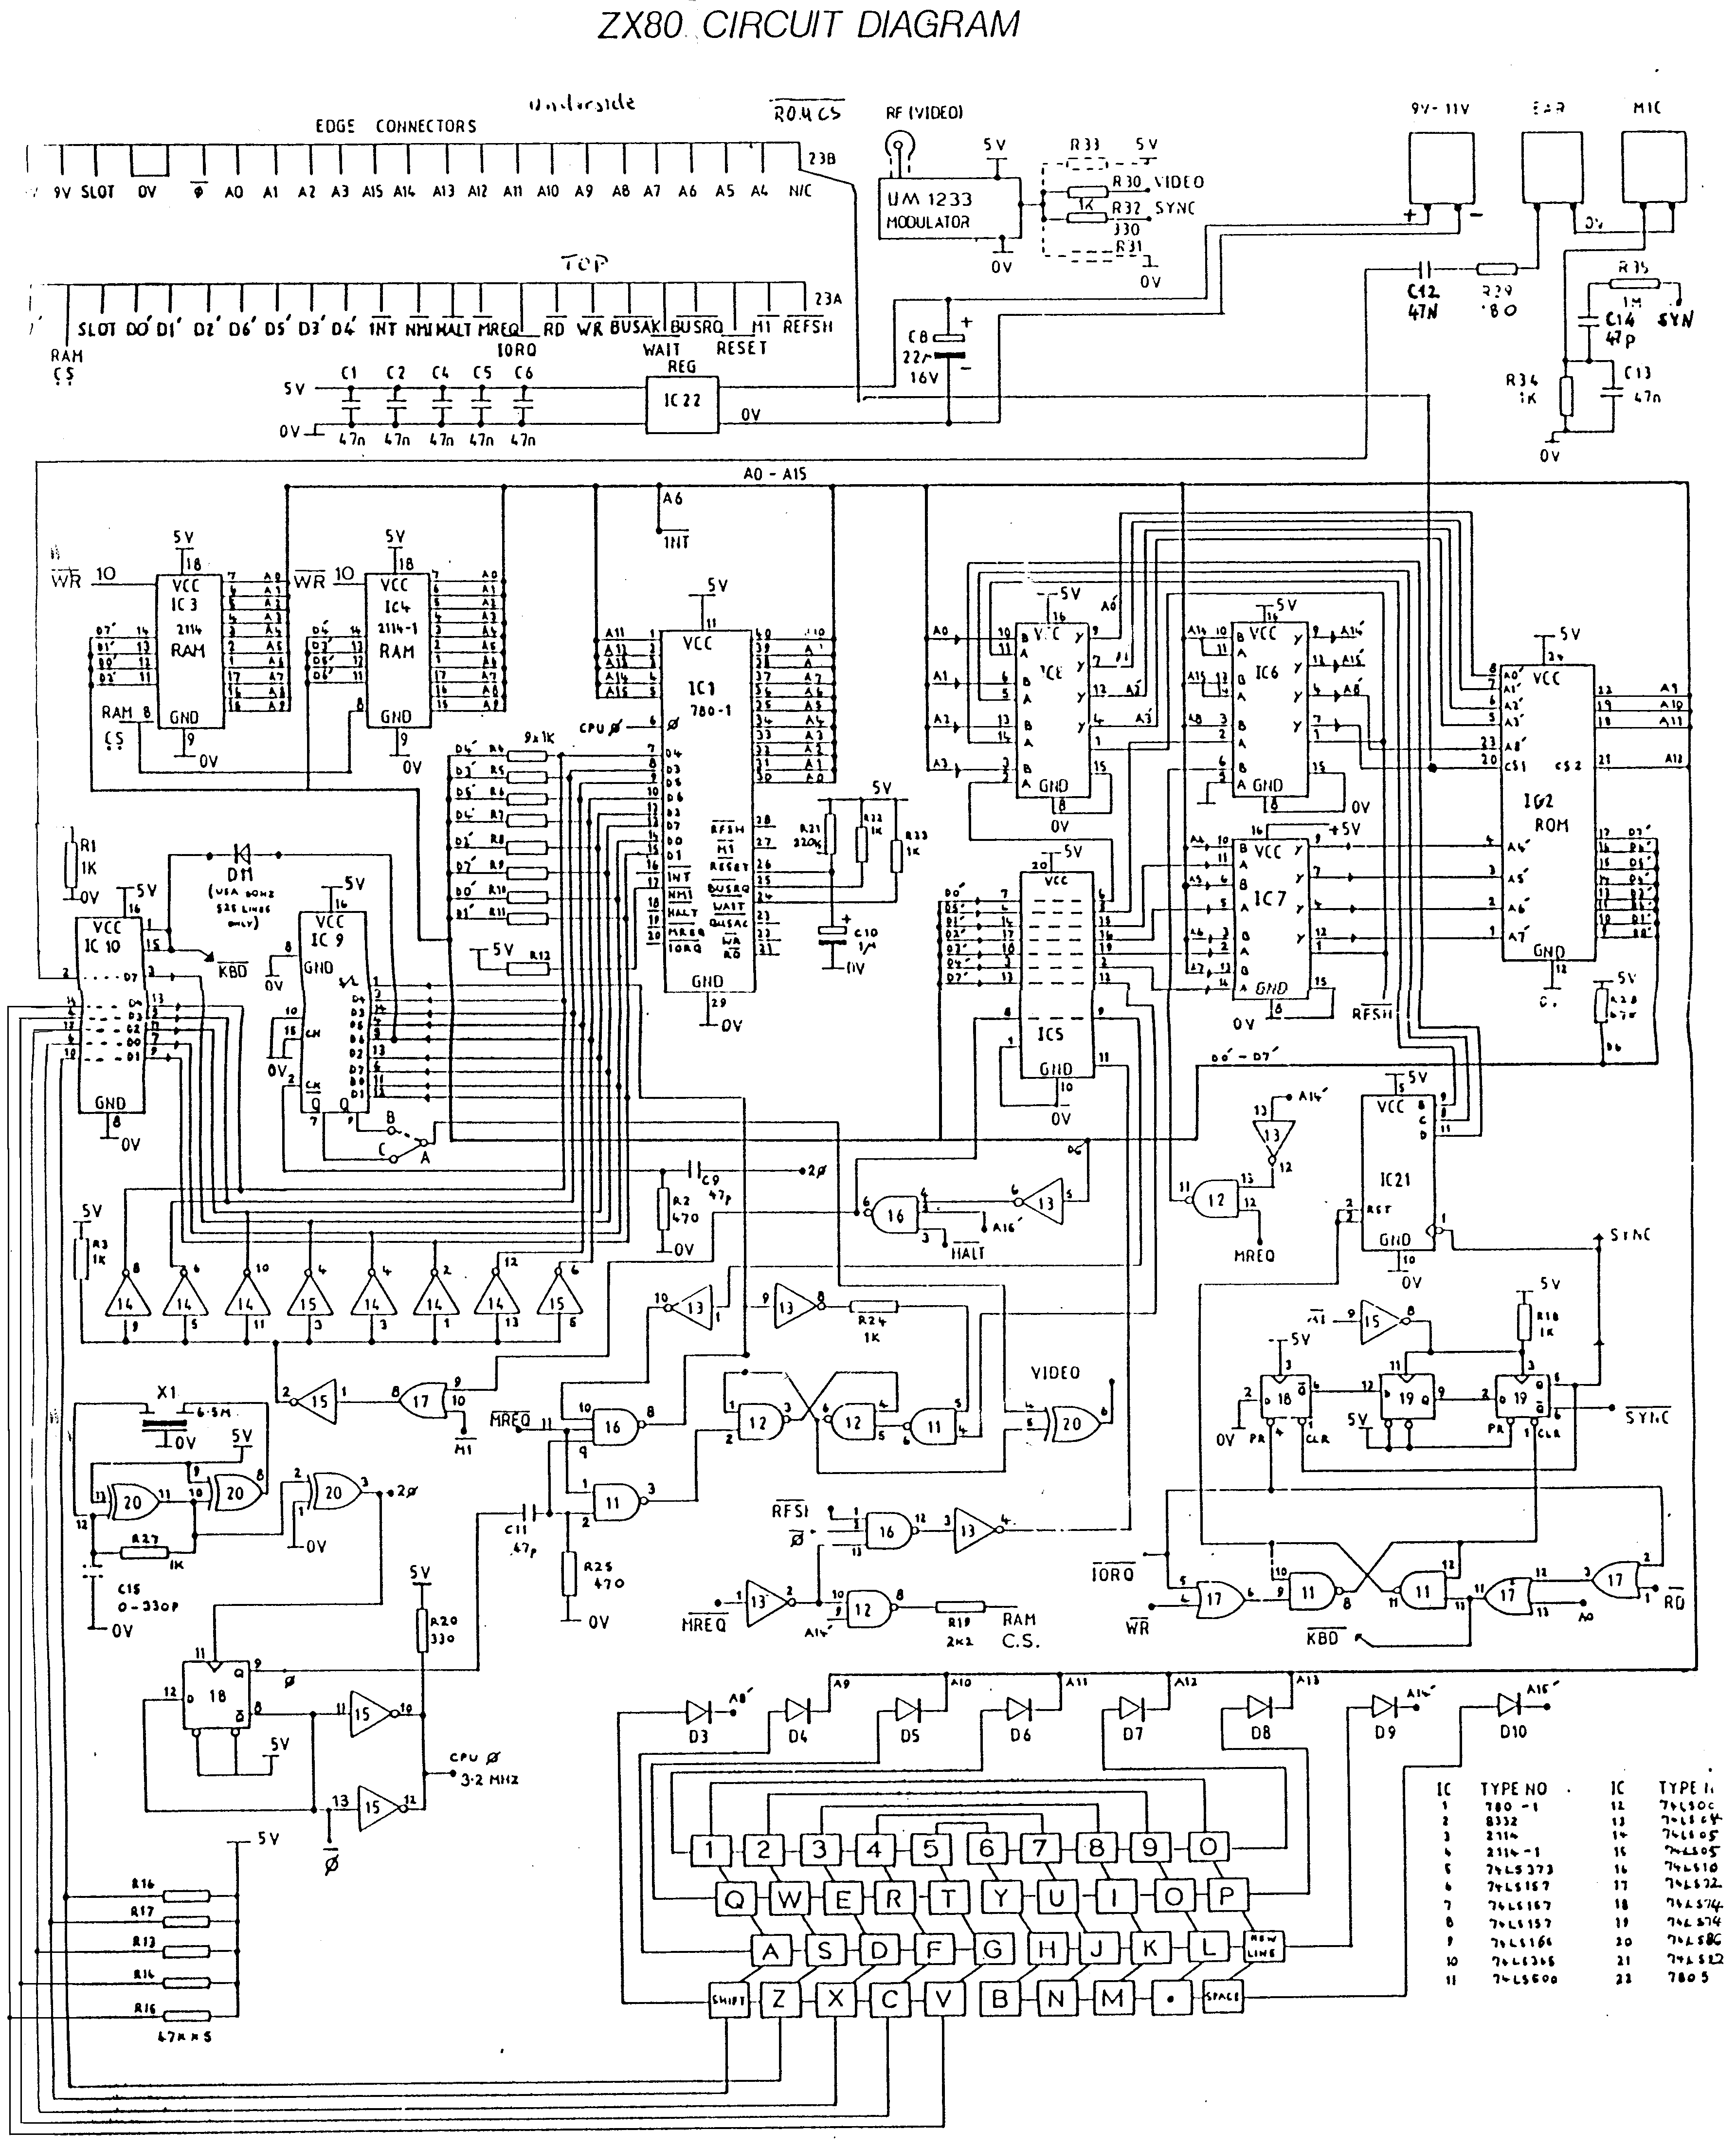
Circuit diagram
I used this diagram to build my version of the ZX80. As a result, I know it is correct. This was originally obtained from ftp.nvg.unit.no but I have tidied it up somewhat.
Click here to download the ZX80 circuit (327KB)
(In Internet Explorer, click using the right-hand
mousebutton then select save location from the menu. In Netscape, hold down the SHIFT key
when clicking to save the image)
Also available is a re-drawn circuit by William Speechley, available here in
"PDF" format. You will need Adobe Acrobat reader to view them, available from www.adobe.com. This has been verified as being correct as
the author built his version from this redrawn circuit. I have also done some checking. It
is excellently drawn with some considerable effort put into it. I have made it available
in two sizes:
Two A4 pages
One A3 page
(In Internet Explorer, click using the right-hand
mousebutton then select save location from the menu. In Netscape, hold down the SHIFT key
when clicking to save the image)
The ZX80 ROM is 4K long. I actually burnt it into an 8K EPROM as that was the smallest I had in my spares box.
You can also use the ZX81 rom image (8K):
(In Internet Explorer, click using the right-hand mousebutton then select save location from the menu. In Netscape, hold down the SHIFT key when clicking to save the ROM images)
For the ZX81 ROM to work you must take A12 to the appropriate address line on the ROM and ground the /OE pin.
I actually now use a 16KB ROM with BOTH images blown into it with a switch on the A13 line to determine whether to run the ZX81 or ZX80 image.
The overlay here is sized to fit over a set of minature tactile pushbuttons set at 0.3 inches between centres. You can either resize as necessary or cut out the keys to place on standard keys.
Visio version: Click here to download the ZX80 overlay
WMF format: Click here to download the ZX80 overlay
Pictures of my finished version (ZX80 only at the moment)
Will be here shortly
ZX80
Follow this link to go to my ZX80 software page, featuring a flicker-free space invaders game for you to type in!
ZX81
A software archive for the ZX81 is available at ftp.nvg.unit.no. (No archives on
the Net for the ZX80 at the moment. If I can, I will move my ZX80 tapes into this area).
These files are in the ".P" format as used by XTENDER, the ZX81 emulator. To use
these on a real ZX81, you can build a VERY simple cable connected to the parallel port and
use this program by Wilf
Rigter to send the files to the ZX81.
Links to other sites of interest
Build your own Jupiter Ace - my page showing you how to build this old micro
Build your own UK101 - my page showing you how to build a greatly simplified version of this old micro
Paul Robson's ZX80 and ZX81 Emulator - excellent freeware emulator
The German ZX-TEAM - A page by Peter Liebert-Adelt
"The" software
archive for the ZX81 - at ftp.nvg.unit.no
XTender homepage - another excellent
emulator (shareware) by Carlo Delhez
I hope this page has been useful.
Grant.
To contact me, my current eMail address can be found here. Please note that this address may change to avoid spam.
Note:All information shown here is supplied "as is" with no warranty whatsoever. All copyrights recognised. Although free to use, the ROM image is copyright Amstrad.